Nurture Campaigns
Set up Your Nurture Campaign
Written By:
Last Updated on September 13, 2024
Create the campaign
In the left sidebar, click Campaigns
Click Create Campaign then select Nurture Campaign
Name your campaign with an intuitive and descriptive title
Now, you've created an empty, disabled Nurture Campaign. It's time to start customizing and personalizing it.
Let's start with deciding which of your connections you want to nurture. There are two ways to put together your Nurture List, via the Connection page or through Sales Navigator.
Build your Nurture List via the Connections page
If you have a small network, we recommend using this method. If you choose this option, you will only be targeting connections that were made through SocialLead.
Note: Moving connections from prospecting campaigns will stop the messaging automation if those users are currently in a sequence.
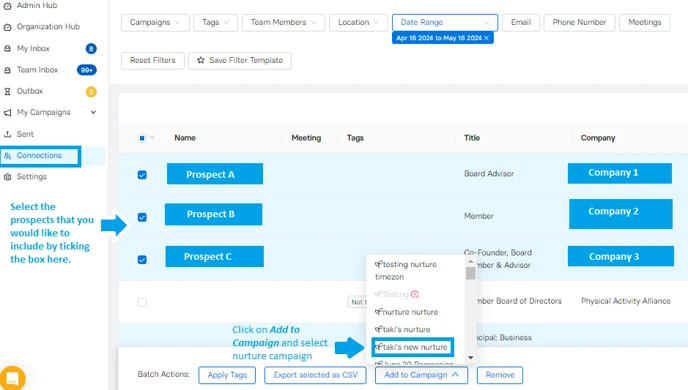
In the left sidebar, click Connections
Tick the connections you want to be included in your campaign
At the bottom of the screen, click Add to campaign and select your new Nurture Campaign.

PRO TIP: You can use our tagging feature to refine the connections list. This will give you the ability to include or exclude specific tags (i.e. Replied, No Reply). You can also sort through the connections using the date range or location filter.
Import a Nurture List via Sales Navigator
If you already have a large network, we recommend using this method. If you choose this option you have the ability to target both connections you have made through SocialLead and anyone else in your LinkedIn network.
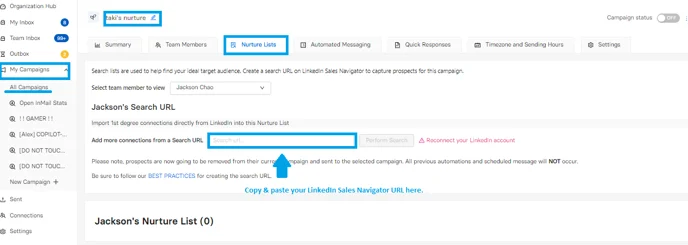
In your newly created Nurture Campaign, click Nurture List
Paste a Sales Navigator search URL directly into the space provided
From here, your search list will be imported into the campaign

Note: If you select to add connections from other campaigns, they will only be included in your Nurture Campaign if automation from other campaigns has ended.
Nurture your network with engaging messages
Nurturing is all about showing value in your messaging. Nurture campaigns operate better with longer gaps in between messages, so the timing options start with days rather than hours. Ideally, we recommend waiting weeks in between Nurture messages.
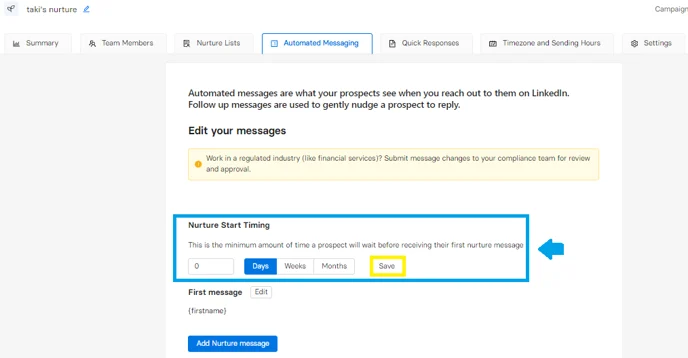
Manage your campaign automation by clicking the Automated Messaging button within your Nurture Campaign. Within this page, you can:
Set the delay before a prospect gets their first nurture message
Add Nurture Messages (there is no limit to how many messages you add)
Edit or delete messages already in the campaign
Note: The start date of your nurture campaign will be determined by the time selected in the Nurture Start Timing section. It will default to 1 month unless adjustments are made, to ensure that prospects do not receive too many messages within a short period of time.
TIP: If you would like the campaign to begin immediately then we suggest setting the Nurture Start Timing to 0 days. Make sure to click Save next to the designated time to ensure your changes will be applied.

Click here to learn more about building your campaign messages.
Handle your inbox like a pro
When you get a reply from your Nurture Campaign, the message will appear in the In Progress tab in the card view inbox. If you use the list view, the reply will be at the top of the inbox. The automation will cease once the first reply comes in from a connection in the campaign.
The best way to manage your replies is to prepare for them ahead of time. This can save hundreds of hours for you down the road. Navigate to Quick Responses within your Nurture Campaign to manage these replies. Here, you can:
Add new or existing templates from other campaigns to your Nurture Campaign (you can reuse templates across multiple campaigns)
Edit or delete templates
Related to Nurture Campaigns

